
티스토리 뷰
Custom View 를 만들때, depth 를 한번더 늘리는 dummy layout 을 없애기 위해 필요한 태그
(xml depth 에 따라 랜더링 성능이 결정되기 때문에 뎁스가 늘어날 수록 성능면에서 치명적이라고 볼 수 있음.)
예시
아래와 같은 custom view 가 있다.
cusom_button.xml 소스
<?xml version="1.0" encoding="utf-8"?>
<LinearLayout xmlns:android="http://schemas.android.com/apk/res/android"
    android:layout_width="wrap_content"
    android:layout_height="wrap_content"
    android:orientation="vertical">
    <Button
        android:id="@+id/btn_test"
        android:layout_width="wrap_content"
        android:layout_height="wrap_content"
        android:text="테스트"/>

</LinearLayout>
CustomButton.kt 소스
package com.example.mergetest

import android.content.Context
import android.util.AttributeSet
import android.view.LayoutInflater
import android.widget.LinearLayout

class CustomButton @JvmOverloads constructor(
    context: Context, attrs: AttributeSet? = null, defStyleAttr: Int = 0
) : LinearLayout(context, attrs, defStyleAttr) {
    init {
        LayoutInflater.from(context).inflate(R.layout.custom_button, this, true)
    }
}
보통 커스텀뷰를 만들고 내가 사용하고자 하는 activity 에 아래와 같이 추가할 것이다.
activity_main.xml
<?xml version="1.0" encoding="utf-8"?>
<androidx.constraintlayout.widget.ConstraintLayout xmlns:android="http://schemas.android.com/apk/res/android"
    xmlns:app="http://schemas.android.com/apk/res-auto"
    xmlns:tools="http://schemas.android.com/tools"
    android:layout_width="match_parent"
    android:layout_height="match_parent"
    tools:context=".MainActivity">

    <com.example.mergetest.CustomButton
        android:id="@+id/custom_view_test"
        android:layout_width="wrap_content"
        android:layout_height="wrap_content"
        app:layout_constraintTop_toTopOf="parent"
        app:layout_constraintBottom_toBottomOf="parent"
        app:layout_constraintStart_toStartOf="parent"
        app:layout_constraintEnd_toEndOf="parent" />

</androidx.constraintlayout.widget.ConstraintLayout>
이제 화면을 실행해보면 아래와 같이 정상적으로
버튼이 노출됨을 확인할 수 있다.

activity_main.xml 과
custom_button.xml 사이는 내가 작성한 코드대로라면, 아래와 같은 구조로 구현되어야 한다.
<ConstraintLayout>
	<!-- start Custom View -->
    <LinearLayout>
    	<Button />
    </LinearLayout>
</ConstraintLayout>
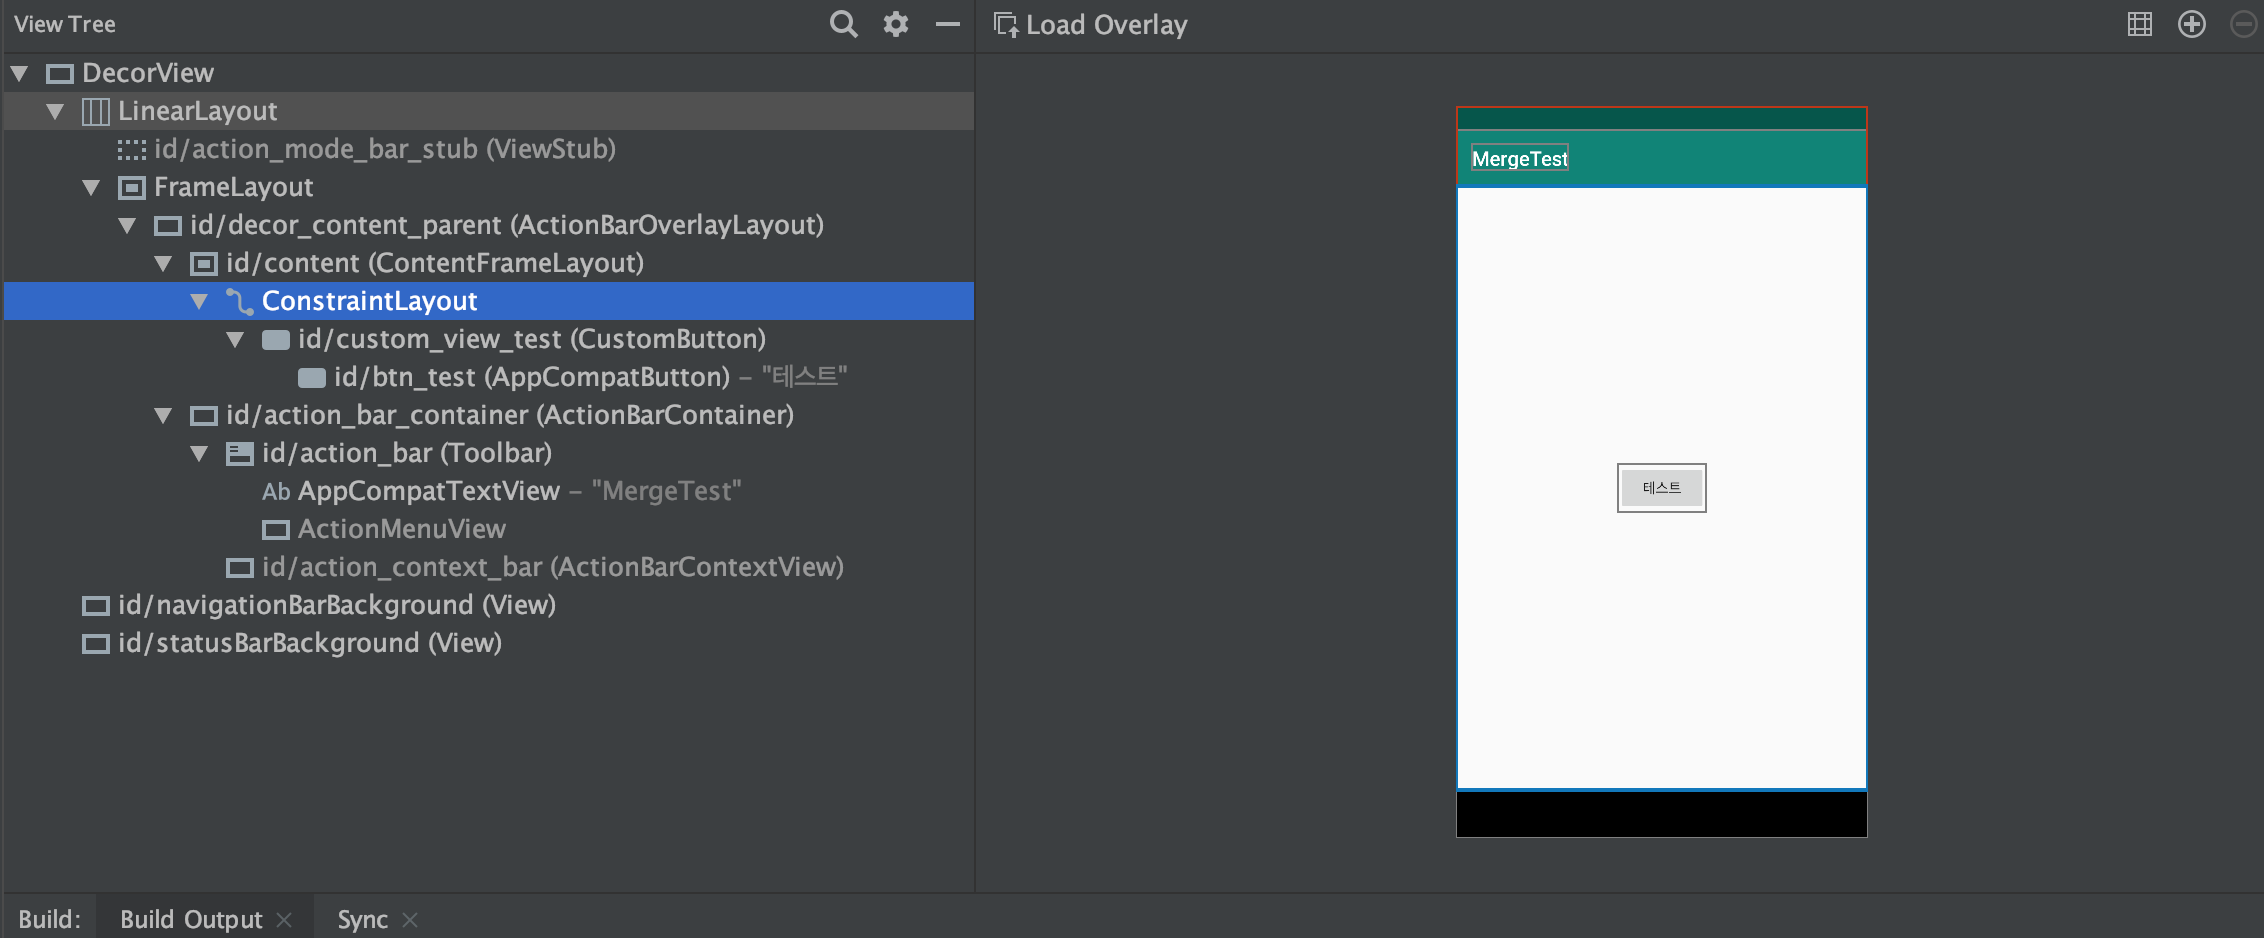
이제 Layout inspector 로 Layout 구조를 살펴보자

위 화면을 보면 알겠지만,
main.xml 의 constraint layout 과
custom_button.xml 의 Linear Layout 사이에 뎁스가 하나 더 존재함을 볼 수 있다.
inflate 로 추가가 많은 뷰의 경우 이러한 더미뎁스 하나하나가 뷰를 그릴때 치명적일 수 있다.
해결은 xml merge 속성으로 해결 할 수 있다.
custom_button.xml 소스를 아래와 같이 변경해보자
<?xml version="1.0" encoding="utf-8"?>
<merge xmlns:android="http://schemas.android.com/apk/res/android">
    <Button
        android:id="@+id/btn_test"
        android:layout_width="wrap_content"
        android:layout_height="wrap_content"
        android:text="테스트"/>
</merge>
단순히, 부모역할을 하고 있던 LinearLayout 을 merge 태그로 변경한 것 뿐이다.
실행해보면 Layout 의 변화는 없다.

이제, Layout Inspector 를 다시 보자
우리가 원하던 대로 1 depth 가 줄어든 custom view 가 탄생했다.
<merge /> tag 를 이용할 때, 아래와 같은 주의점만 주의해주면 된다.
1. tag 는 xml 최상위 tag 로만 사용되어야 한다.
2. attach 되는 ViewGroup 을 반드시 명시해 주어야함. (ex> attachToParent:true)
참고 : https://developer.android.com/training/improving-layouts/reusing-layouts.html
로 레이아웃 재사용 | Android 개발자 | Android Developers
Android에서는 다양한 위젯을 통해 재사용 가능한 작은 상호작용 요소를 제공하지만, 특수 레이아웃이 필요한 큰 구성요소를 재사용해야 할 수도 있습니다. 전체 레이아웃을 효율적으로 재사용하려면 보기를 사용하고, 다음을 ...
developer.android.com
오늘도 많은걸 배웠다. 세상엔 참 대단한 개발자분들이 많은 것 같다..
항상 겸손하며 배우는 자세를 가져야함.ㅁ.
'Computer > Android&iOS' 카테고리의 다른 글
| iOS 10 이상 push event (0) | 2021.04.13 |
|---|---|
| (Android) RxJava 요소들 정리 (0) | 2019.12.24 |
| (Android) constructor fragmentstatepageradapter(fragmentmanager)' is deprecated. deprecated in java (0) | 2019.12.19 |
| ( Android ) Android runtime compiler (0) | 2019.12.17 |
| kotlin - lambda argument should be moved out of parentheses (1) | 2019.11.25 |
- Total
- Today
- Yesterday
- IOS
- BBC 가쉽
- 서버
- 점유율
- Node
- 손석희
- C언어
- GIT
- 리눅스
- git hub
- 깃헙
- 노드
- 스위프트
- mysql
- nodejs
- linux
- C
- 뉴스룸
- Android
- Phaser
- Asterisk
- Swift
- Kotlin
- 배열
- 앵커브리핑
- 안드로이드
- xcode
- CentOS
- php
- node.js
| 일 | 월 | 화 | 수 | 목 | 금 | 토 |
|---|---|---|---|---|---|---|
| 1 | 2 | 3 | 4 | |||
| 5 | 6 | 7 | 8 | 9 | 10 | 11 |
| 12 | 13 | 14 | 15 | 16 | 17 | 18 |
| 19 | 20 | 21 | 22 | 23 | 24 | 25 |
| 26 | 27 | 28 | 29 | 30 | 31 |